It has been a while since my last post. I apologize for that, but I moved my home and my working place to a new and shiny location. There was a lot of screwing, drilling, constructing and dragging but no cutting or glueing during the last weeks.
Anyway, here's a lovely new panty made from 0.35mm lemongreen latex with a white edging cut with a large wave form rotary cutter.
Both sides are made of 4 white (10mm wide) latex strips that give the panties a very good fitting (at least on skin).
The pattern is basically a Hello Kitty modification.
The little heart is hand-cut from 0.35mm white latex and glued to the panties (I apply glue to the backside of the applique only).
I'm also almost finished with another cute promotional outfit made-to-measure for Erika Tschirhart and hope I can show some pictures soon.
Tuesday, March 29, 2011
Sunday, February 20, 2011
Making latex bows
Girls like bows.
This tutorial shows how I made a couple of red latex bows for one of my next creations.
1. Cut pieces of 80mm length from a strip of 12mm wide and 0.35mm thick red latex. Change these measurements for smaller or larger bows (top left).
2. Clean each piece on the backside. Appy some latex milk to both edges and to the center. After the glue has dried flip and glue both edges to the center. Use a ruler or the grid of your working space for correct alignment (top right).
3. Use talcum powder to prevent glueing where unwanted on the finished bow parts (bottom left).
4. The knot is made from a 14mm long piece of latex that was cut from a 10mm wide strip. I prefer the knot and the loose ends to be a little bit smaller than the bow. Clean and apply latex milk to the back side of the knot and the frontside of the bow part. Glue half of the knot pice to the bow part, than roll the bow part, so you can glue the other half of the knot piece to the other side of the bow part (bottom right). This is the most difficult part. Practice before you glue!
5. The result should look like the bows on the images to the right (upper left).
6. Cut the loose ends from the 10mm wide strip, approximately at a length of 35mm. Glue two pices together in a sharp angle (top right).
7. Cut the piece even on top, clean and apply glue. Also clean and apply glue to the back of the bow (bottom left).
8. Glue both parts together and cut the loose ends in form. The bows are finished (bottom right).
Find another excellent tutorial on making bows on Making Latex Clothing.
This tutorial shows how I made a couple of red latex bows for one of my next creations.
1. Cut pieces of 80mm length from a strip of 12mm wide and 0.35mm thick red latex. Change these measurements for smaller or larger bows (top left).
2. Clean each piece on the backside. Appy some latex milk to both edges and to the center. After the glue has dried flip and glue both edges to the center. Use a ruler or the grid of your working space for correct alignment (top right).
3. Use talcum powder to prevent glueing where unwanted on the finished bow parts (bottom left).
4. The knot is made from a 14mm long piece of latex that was cut from a 10mm wide strip. I prefer the knot and the loose ends to be a little bit smaller than the bow. Clean and apply latex milk to the back side of the knot and the frontside of the bow part. Glue half of the knot pice to the bow part, than roll the bow part, so you can glue the other half of the knot piece to the other side of the bow part (bottom right). This is the most difficult part. Practice before you glue!
5. The result should look like the bows on the images to the right (upper left).
6. Cut the loose ends from the 10mm wide strip, approximately at a length of 35mm. Glue two pices together in a sharp angle (top right).
7. Cut the piece even on top, clean and apply glue. Also clean and apply glue to the back of the bow (bottom left).
8. Glue both parts together and cut the loose ends in form. The bows are finished (bottom right).
Find another excellent tutorial on making bows on Making Latex Clothing.
Wednesday, February 2, 2011
Iphoneographic Ann in zitronenröllchen
The iphoneography hero beastyRockStar has shot Ann during a pre-shooting fitting session wearing a couple of zitronenröllchen promo outfits. Here are some of them.
© all photos by beastyRockstar
model :: Ann
shooter :: beastyRockStar
latex :: zitronenröllchen
Tuesday, January 25, 2011
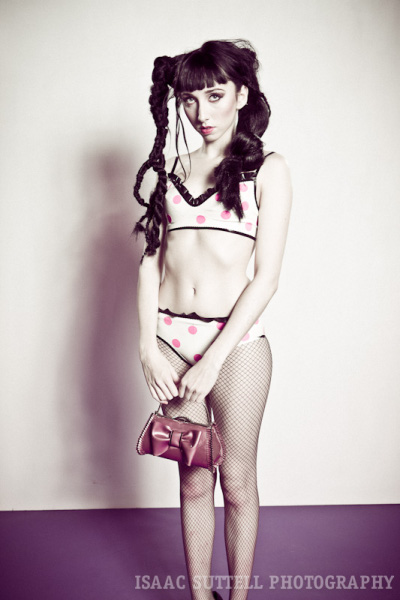
Miss Tschirhart in zitronenröllchen (II)
Look at that girl. Look at those impressive photos. Isaak Suttell has shot Erika Tschirhart wearing zitronenröllchen this time.
photographer :: Isaac Suttell
hairstylist :: Gabe Jenkins
makeup-artist :: Richard Espinoza
© all photos by Isaac Suttell
model :: Erika Tschirhart photographer :: Isaac Suttell
hairstylist :: Gabe Jenkins
makeup-artist :: Richard Espinoza
The stunning Miss Tschirhart wears zitronenröllchen
I wish I could describe how lucky I am. Lou Bedlam has shot Erika Tschirhart wearing panties and bra made by me. Enjoy the photos.
© all photos by Lou Bedlam
model :: Erika Tschirhart
photographer :: Lou Bedlam
makeup artist :: Taryn Piana
model :: Erika Tschirhart
photographer :: Lou Bedlam
makeup artist :: Taryn Piana
Sunday, January 16, 2011
Purple Undies
This set of purple underwear consists of bra, panties and garter belt.
They are made of 0.4mm thick purple latex sheeting and 0.25mm thick and 8mm wide black latex edges.
All edges are cut with a wave form rotary cutter on the inner side to give the garments a discreet look.
For the bra's shoulder straps I used 0.6mm thick and 9mm wide black latex strips and some rings and sliders (on the back) to adjust the length.
The bra's band is bit narrower than that of the previous bra models I posted here and follows the cup's curve on the front.
The panties are made from one front and two back parts.
I still believe it is necessary to have a concave curve along the center back line for a better fitting of the panties at the backside. As this is not required on the front, I chose this 3-part pattern, which is also a bit narrower than my previous panties models in this blog.
The front is glued to the both back parts behind the diagonal trims.
I already wrote about the garter belt with its latex lace front panel some time ago in this article.
As usual, you can find the patterns for all three garments on my pattern page within the next couple of days.
Hope, you like it.
They are made of 0.4mm thick purple latex sheeting and 0.25mm thick and 8mm wide black latex edges.
All edges are cut with a wave form rotary cutter on the inner side to give the garments a discreet look.
For the bra's shoulder straps I used 0.6mm thick and 9mm wide black latex strips and some rings and sliders (on the back) to adjust the length.
The bra's band is bit narrower than that of the previous bra models I posted here and follows the cup's curve on the front.
The panties are made from one front and two back parts.I still believe it is necessary to have a concave curve along the center back line for a better fitting of the panties at the backside. As this is not required on the front, I chose this 3-part pattern, which is also a bit narrower than my previous panties models in this blog.
The front is glued to the both back parts behind the diagonal trims.I already wrote about the garter belt with its latex lace front panel some time ago in this article.
As usual, you can find the patterns for all three garments on my pattern page within the next couple of days.
Hope, you like it.
Tuesday, January 11, 2011
New York City Promo Trailer
J.O. Films has created a small trailer for our upcoming zitronenröllchen promo tour. Hope you like it. I do. BTW, we are currently looking for a cool location for our shooting in London in early summer. Any ideas?
I'm currently working on a couple of new projects. I hope, I can show some results this week.
Subscribe to:
Posts (Atom)